Login
Work in Progress
 The ARM (A64) partition is not yet available. The HoreKa 2 A64 login node (
hk2-a64.scc.kit.edu) and its associated partition will be brought online in Phase 2 of the HoreKa 2 commissioning. Thank you for your patience!
The primary way to access NHR@KIT systems is via SSH to the dedicated login nodes. Login is only possible to these login nodes — direct access to compute nodes is not available.
HoreKa 2 / HAICORE 3.0
hk2-x86.scc.kit.edufor x86_64hk2-a64.scc.kit.edufor ARM64
Future Technologies Partition (FTP)
ftp-x86.scc.kit.edufor x86_64ftp-a64.scc.kit.edufor ARM64
Full details including individual node names are in the Connecting via SSH section.
All logins require two-factor authentication (2FA). The default login method is a time-based one-time password (TOTP) combined with your service password. As an alternative, SSH keys can be used to avoid entering the OTP and password on every connection after an initial 2FA login.
Access from outside allowed networks requires a VPN connection to your home institution. See Network access & VPN.
JupyterHub is available as a browser-based alternative for interactive work. Additional services such as graphical applications and IDE integration also use SSH as their transport layer and therefore require an active SSH connection.
To connect for the first time:
- Check network access — be on an allowed network or connect via VPN. See Network access & VPN.
- Look up your username — find your login username on FeLS. See Username lookup.
- Set up two-factor authentication — register a TOTP token on FeLS. See Two-Factor Authentication.
- Connect via SSH — use the appropriate login hostname for your system. See Connecting via SSH.
- Respect the login node usage policy — login nodes are shared resources. Do not run compute jobs on them. See Login node usage policy.
Prerequisites
Network access & VPN
Access to NHR@KIT systems is restricted to IP addresses from the following networks:
- KIT internal networks
- All universities and universities of applied sciences in Baden-Württemberg
- All Helmholtz member institutions
- All NHR centres
- Many academic and scientific institutions in Germany (some only reachable via IPv6)
If your device is on one of these networks (e.g. on campus or connected to campus WiFi), you can connect directly. From outside these networks (e.g. from a home office), establish a VPN connection to your home institution first.
KIT VPN
KIT members can find setup instructions for the KIT VPN on the KIT IT Services portal.
If you are unable to connect and cannot use a VPN from one of the listed institutions — in particular if you are located outside Germany — navigate to https://wieistmeineip.scc.kit.edu/ and provide the displayed IP addresses to the support team. We will then find the best way to get you access.
Username lookup
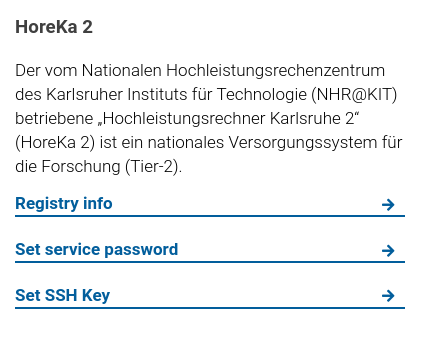
Your login username may differ from your institutional account name, typically it includes a prefix depending on your home organisation. You can find your login username on FeLS by clicking the Registry info link in the respective service box.
The username is shown on the line Username for login:
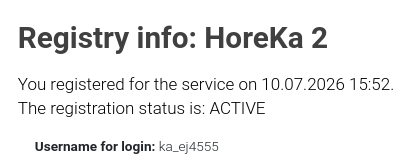
Use this username in all SSH commands, e.g. ssh username@hk2-x86.scc.kit.edu. The username in this example would be ka_ej4555.
Two-Factor Authentication
A two-factor authentication (2FA) mechanism is enforced for all logins on NHR@KIT systems. In addition to the service password, a one-time password (OTP) must be entered on every login.
NHR@KIT uses six-digit, time-based One-Time Passwords (TOTP). These are generated either by a hardware token or by a software token — a software application running on a separate device.

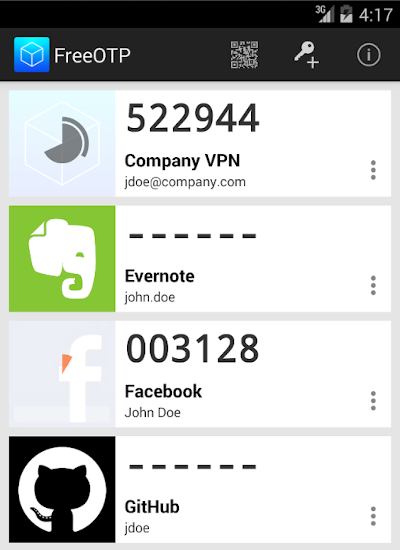
Before first use, the token must be registered for the NHR@KIT service on FeLS. Once registered, it generates a new six-digit code every 30 seconds. Each code is valid only once and only for a short time window.
To register a token, log into FeLS and navigate to Overview → My Tokens (Übersicht → Meine Tokens). See Token Management for step-by-step instructions.
KIT users
KIT users manage their tokens via my.scc.kit.edu/token instead.
The most common approach is to use a smartphone or tablet as a software token. Recommended apps:
- LastPass Authenticator for Android, iOS or Windows
- Authy for Mac, Windows or Linux
- KeePassXC for Mac, Windows or Linux / KeePassDX for Android
Any application compatible with the TOTP standard (RFC 6238) can be used.
Software token security
Do not install the token app on the same device you use to log into the HPC system. If that device is compromised, an attacker can obtain both your service password and your OTP — defeating the purpose of two-factor authentication.
SSH Keys (optional)
SSH keys can be used as an alternative to password-based login. Two types are supported:
- Interactive keys — for regular interactive logins. Requires one initial 2FA login to activate the key; afterwards no password or OTP is needed. With an SSH key pair generated using a FIDO2/U2F hardware security key (
ed25519-sk), no TOTP is required at all. - Command keys — for automated workflows (e.g. scripts, data transfers). Restricted to a single command and IP address, and require administrator approval.
No self-managed authorized_keys
Placing public keys in ~/.ssh/authorized_keys is not supported — such files are ignored. All SSH keys must be managed via the SSH Keys page on FeLS.
See SSH Keys for setup instructions.
Connecting via SSH
After finishing the registration process, the systems are ready for SSH-based login.
Recommended SSH clients:
- OpenSSH: Supports interactive logins and remote file transfers on Linux, macOS, and Windows. On Windows, OpenSSH is pre-installed and available in Windows Terminal and PowerShell.
- MobaXterm: Supports interactive logins, remote file transfers, and X11 forwarding on Windows. See MobaXterm for setup instructions.
To log in, run ssh username@host and replace username and host with the actual username and host address.
-
Hostnames for the x86_64 partition
hk2-x86.scc.kit.eduhk2-x86-login1.scc.kit.eduhk2-x86-login2.scc.kit.edu
-
Hostnames for the ARM64 partition
hk2-a64.scc.kit.eduhk2-a64-login1.scc.kit.eduhk2-a64-login2.scc.kit.edu
The generic hostnames (hk2-x86, hk2-a64) above distribute connections across multiple login nodes in a round-robin fashion — each new connection may land on a different node. If you need to reconnect to the same node (e.g. to resume a running session), use one of the individual login nodes directly (login1, login2).
- Hostname for the x86_64 partition
ftp-x86.scc.kit.edu
- Hostname for the ARM64 partition
ftp-a64.scc.kit.edu
Login process
A successful login goes through the following steps:
flowchart LR
    A["ssh user@host"] --> B[TOTP\none-time password]
    B --> C[Service\npassword]
C --> D[Login established]- Run
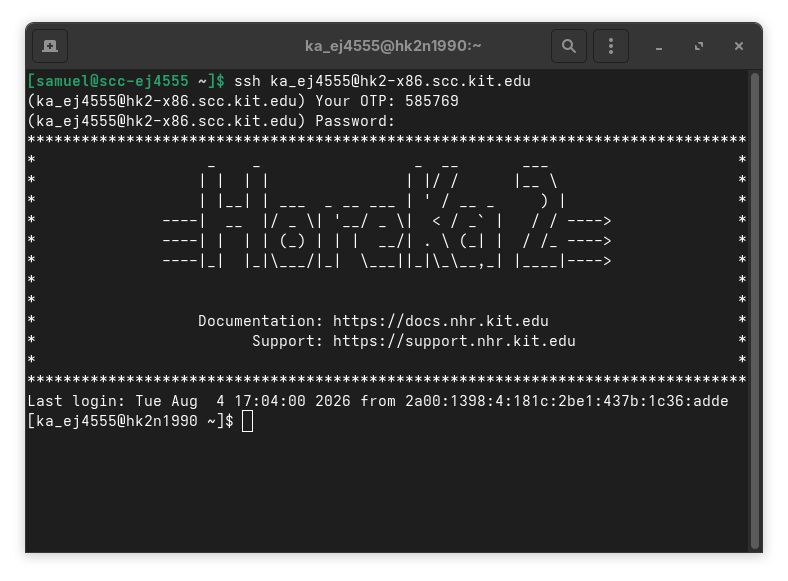
ssh username@<hostname>. The connection is established and the system prompts for authentication. - The system asks for a One-Time Password. Generate one using the Software or Hardware Token registered on FeLS (see Two-Factor Authentication) and enter it at the
Your OTP:prompt. If this prompt does not appear and you go straight to thePassword:prompt, your username was not recognised — check that you are using the correct login username (see Username lookup) or that your registration is complete. - The system asks for your service password. Enter it at the
Password:prompt. The prompt does not echo characters while you type — this is normal. - You are greeted by the system banner followed by a shell prompt.
Host authenticity
On first login you may see a message: The authenticity of host '<host>' can't be established. along with the host key fingerprint. Before continuing, verify that the displayed fingerprint matches one of the following known fingerprints for HoreKa 2 / HAICORE 3.0:
- RSA:
SHA256:ulMZhgXlKB8410g0g5CGB7naJTtZt2sgfVxcYO/SjjM - ECDSA:
SHA256:+UIaffME+PA88qC1Y6R1bdBPXEfPSeGykpUR6n0naqY - ED25519:
SHA256:ly/kqxhDa8/Y8m21KQNItEZ2v8nNFIhfhm5czXfBqM4
You can retrieve and verify the fingerprints programmatically using ssh-keyscan:
This prints the fingerprints of the host keys currently presented by the server. Compare the output against the known fingerprints listed above before accepting the connection.
If you are using OpenSSH and need X11 forwarding for GUI applications, add the -X parameter:
Login node usage policy
The login nodes are shared resources. Permitted activities include:
- Viewing and editing files
- Executing batch system commands (
sbatch,salloc,squeue, etc.) - Compiling small to medium-sized code bases
- Short pre- and post-processing runs on a small number of cores
Everything that occupies cores for more than a few minutes must be submitted to the batch system. This includes long-running compilations and pre- or post-processing runs.
Any compute job found running on the login nodes will be terminated without further notice.
We are experiencing significant load on the login nodes generated by AI agents and helper tools. To ensure fair access and system stability for all users, the following policy applies:
Interactive AI agent usage on login nodes is prohibited
Interactive use of AI agents (such as ChatGPT, Claude, or similar tools) on login nodes is not allowed. This includes running AI agent processes, API calls, or similar interactive workloads on login nodes.
Use the SSH tunnel to compute nodes to run AI agents on a dedicated compute node instead.
See also: Terms of Use & Policies
Terminal Multiplexer (tmux)
tmux is a terminal multiplexer available on all NHR@KIT login nodes. It keeps your session running on the server even when the SSH connection drops, so you can detach and reattach at any time — useful, for example, to let a long-running rsync or scp transfer complete uninterrupted.
| Action | Command |
|---|---|
| Start a new session | tmux new -s mysession |
| Detach from session | Ctrl+b, then d |
| List sessions | tmux ls |
| Reattach to session | tmux attach -t mysession |
| Kill a session | tmux kill-session -t mysession |
Do not run compute jobs in tmux
tmux sessions run on the login nodes and are subject to the same login node usage policy. Do not use tmux to run compute jobs, long-running simulations, or anything that should be submitted to the batch system instead.
A full tmux reference is available via man tmux or the official tmux wiki.